To successfully copy and compress DVDs with ARccOS protection, including Casino Royale, Stranger Than Fiction, and others, you'll need two free programs before beginning:
1. DVDFab (
download the free version here)
2. DVD Shrink (
download here)
For burning, you'll need a program than can burn ISO files to disc. Nero for PC has this feature. You can also use the free programs
DVD Decrypter or
ImgBurn to burn your compressed ISO to a blank DVD.
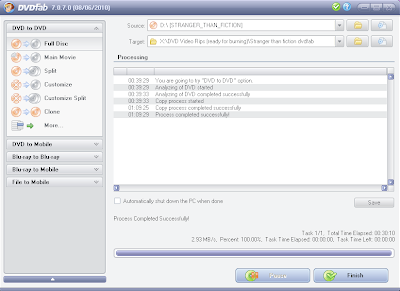
Rip the Full DVD to your Hard Drive with DVDFabUse the Full Disc option in DVDFab to rip the disc contents to your hard drive. This will create a pair of folders called VIDEO_TS and AUDIO_TS that contains all the video files for the DVD movie. Only the VIDEO_TS folder will have files inside of it.
On my late 2007 2.2GHZ MacBook Pro with an 8x superdrive (running Windows XP virutal machine in Parallels 5), the ripping took 30 minutes. The ripping time will vary depending on the speed of your disc drive and the full size of the disc.
Most fully ripped discs will be 6.5 to 7.5GB in size because commercially produced DVDs are dual-layer and can hold up to 8.5GB of data.
 Compress the Ripped Files in DVD Shrink
Open the DVD Shrink program, Click on the icon to "Open Files".
Navigate to the place on your hard drive with the folder where you ripped the full disc of Stranger Than Fiction. Select the Stranger Than Fiction folder.
DVD Shrink will take about a minute to analyze your DVD movie files to see how much compression it needs to apply.
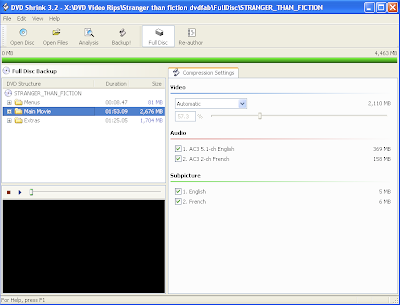
You're now presented with two panels, the DVD Structure on the left and the compression settings on the right.
The first step will be to remove any unneeded audio languages. This movie only has French as the additional audio. Some DVDs will have French, Spanish, Chinese, etc. After you uncheck the extra audio tracks, notice how the quality percentage of the main movie has increased.
Don't bother unchecking extra subpictures (subtitles). Removing them won't really impact the quality of the copy, so they can be left alone.
DVD Shrink produces very good quality copies at 70% or more. If you can reach 80% or more for the main movie folder, you'll have a copy that is very hard to distinguish from the original.
To get the quality up to 70% or more, click on the plus sign by the Extras folder in the left panel. Remove all the movie previews on the disc. To see which files are previews, select one of the files and then click on the play button below to review it. (You can drag the slider to seek through the video file quickly.) To remove any segment from the DVD, select the file in the left pane and then change "Automatic" in the drop down menu in the right pane to Movie previews are usually files that are 40-80MB in size. Sometimes they are bundled together in files that are much larger like 100-300MB.
Remove any special features from the disc you don't want.
If you want to keep any special features on the disc, I strongly recommend selecting them individually and setting a custom compression ratio to reduce their quality. Think about it, you'll probably watch the features once and never see them again.
To check on the quality of your disc after removing previews and special features, select the
Main Movie folder in the left pane and look at the quality percentage that displays in the right pane.
When you're satisfied with the quality you've got (I recommend 70% or higher), click on the Backup! icon.
The output options you choose here are important for burning, don't breeze past these.
For the Backup Target, select
ISO Image File. For anyone new to this process, an ISO file is one file that includes all the contents of a disc.
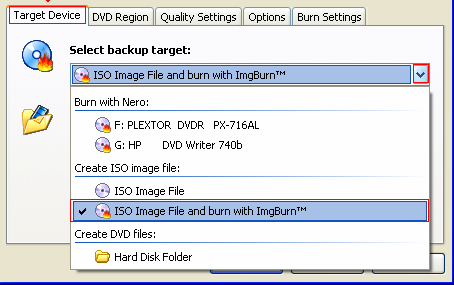
You can leave the rest of the settings alone.
After double checking that your backup target is an ISO image file, click on Ok.
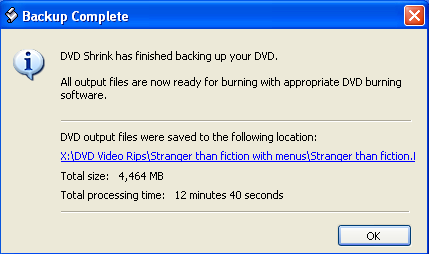
DVD Shrink will now compress the video files and create an ISO image file that is ready for burning. It will take about 10-15 minutes, depending on the speed of your hard drive.